1DShop
Sell FiveM scripts, vehicles and more in Discord, with carts, private purchase tickets and your own payment links.
1DShop turns your server into a store. You add products on the dashboard and post them in a channel. Members add them to a cart and check out in a private purchase ticket. The bot totals it up and sends your own payment links (PayPal, Cash App, Venmo and so on). When the buyer says they've paid, your staff are pinged. Staff check the payment and press Confirm payment, and the bot gives the buyer their roles and a receipt.
1D3R never handles money. Buyers pay you directly. The bot only shows your payment details and keeps track of orders.
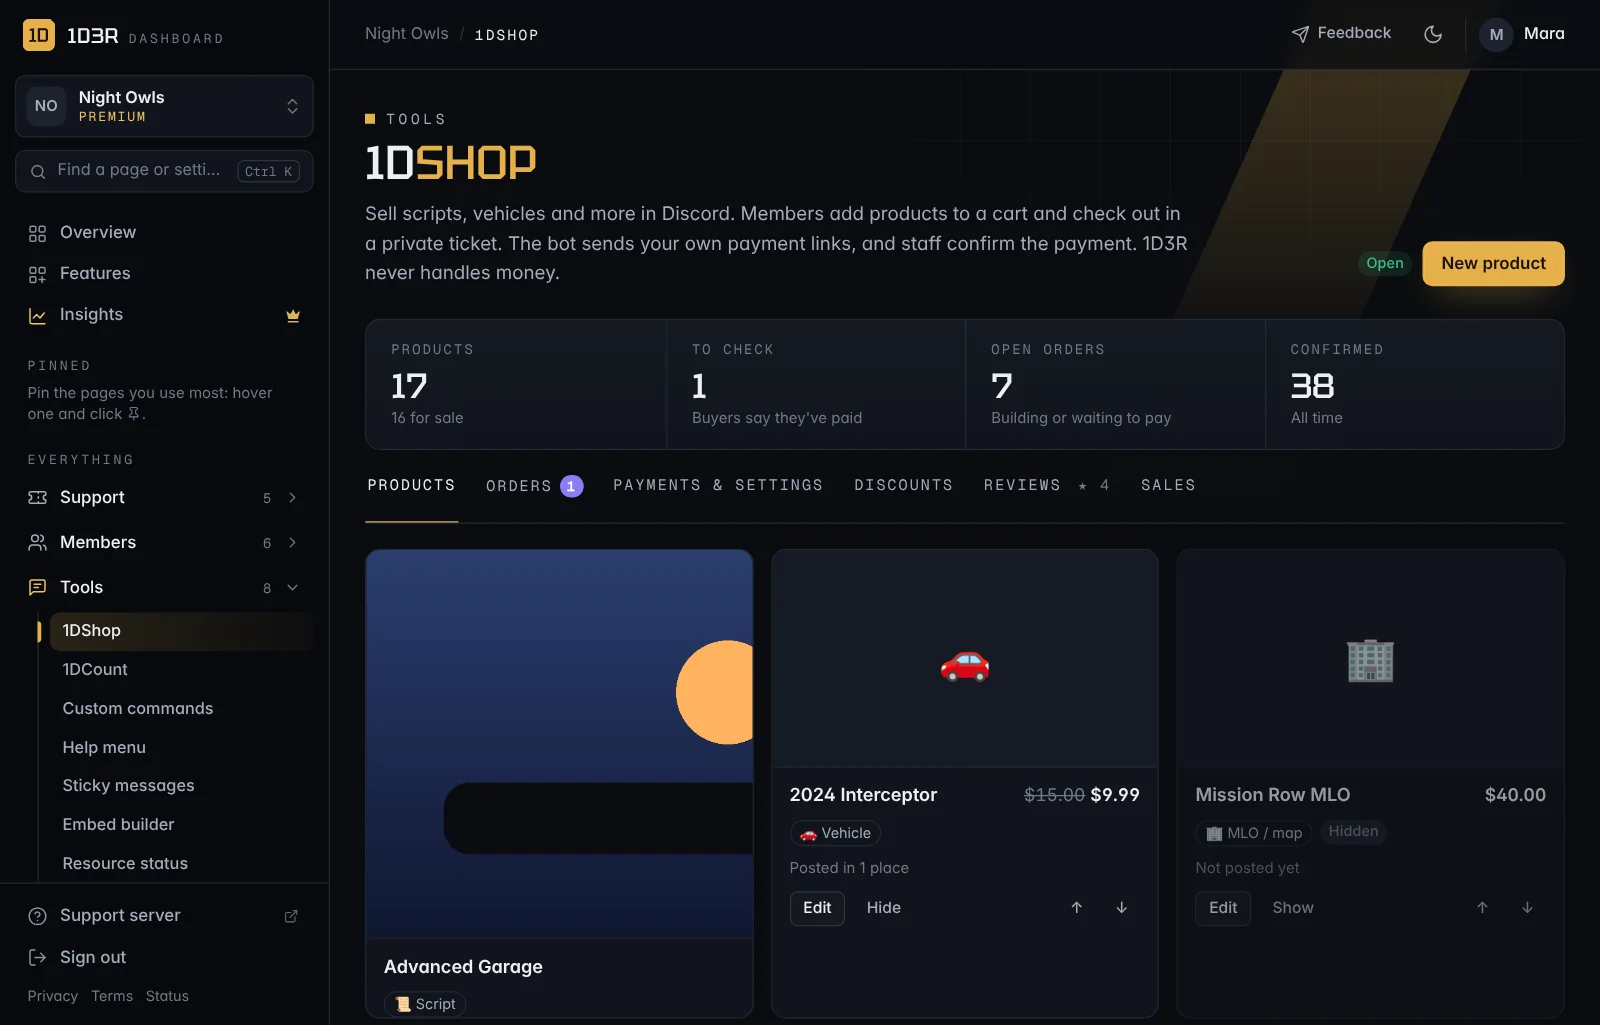
Set it up
- In the dashboard, open 1DShop (under Tools).
- Go to Payments & settings and add at least one way to pay: a name (like PayPal), and a link (like
https://paypal.me/yourname) or some details (like an email for Zelle). - Choose the staff who confirm payments. They see every purchase ticket and get pinged when a buyer pays. Members with Manage Server can always confirm.
- Switch on Open the shop and save.
- Add a product with New product.
- Post it: on the product, use Post it. Or post the whole shop at once from Products → Post the shop.
The bot needs Manage Channels to open purchase tickets and Manage Roles to give roles. Its own role has to be above any role it gives.
Products
Each product has:
- Name, description and price. A sale price shows the old price crossed out.
- Type: Script, Vehicle, MLO / map, Clothing / EUP, Bundle or Other. For scripts you can also say which frameworks they work with (ESX, QBCore, Qbox, vRP, ox_core, Standalone) and whether they're escrow protected or open source.
- Features: one per line, shown as a list.
- Up to 10 photos, shown as a gallery on the listing. Upload several at once or paste links, drag them (or use the arrows) to change the order, and the first one is the main photo. Members tap a photo in Discord to see them all full size. Each photo can have a short description for members who use screen readers.
- An optional preview video link, which adds a Preview button.
- Roles to give when the order is confirmed (up to 5 on the free plan, 25 with Premium), for example a role that opens a buyer-only support channel. Members who already have all of a product's roles are told they own it and can't add it to their cart. Your shop-wide customer role doesn't count, and a product that gives no roles can always be bought.
- A delivery note, sent only to the buyer in their receipt. Use it for download links, Keymaster steps or install instructions.
- Optional download channels (channels or forums): one on the free plan, up to 25 with Premium. Once the order is confirmed, the buyer gets links to them in their ticket and in their DM receipt. Make sure the product's role can see those channels.
- Or a Google Drive link instead of a download channel: under How buyers get the files, pick Google Drive link and paste the file or folder link. Buyers get an Open in Google Drive button in their receipt and ticket, only after the payment is confirmed.
- Buyers request access: tick it when the Drive link is set to Restricted. The buyer opens the link, requests access with their Google account, then presses I've requested access and types the email they used. Your staff are told in the staff channel (or the purchase ticket, or the orders log) with the email and an Access given button. Share the file with that email in Google Drive, press Access given, and the buyer gets a DM. Requests nobody has dealt with also wait at the top of the Orders tab.
- Leave it unticked if the link is set to Anyone with the link: buyers just open it.
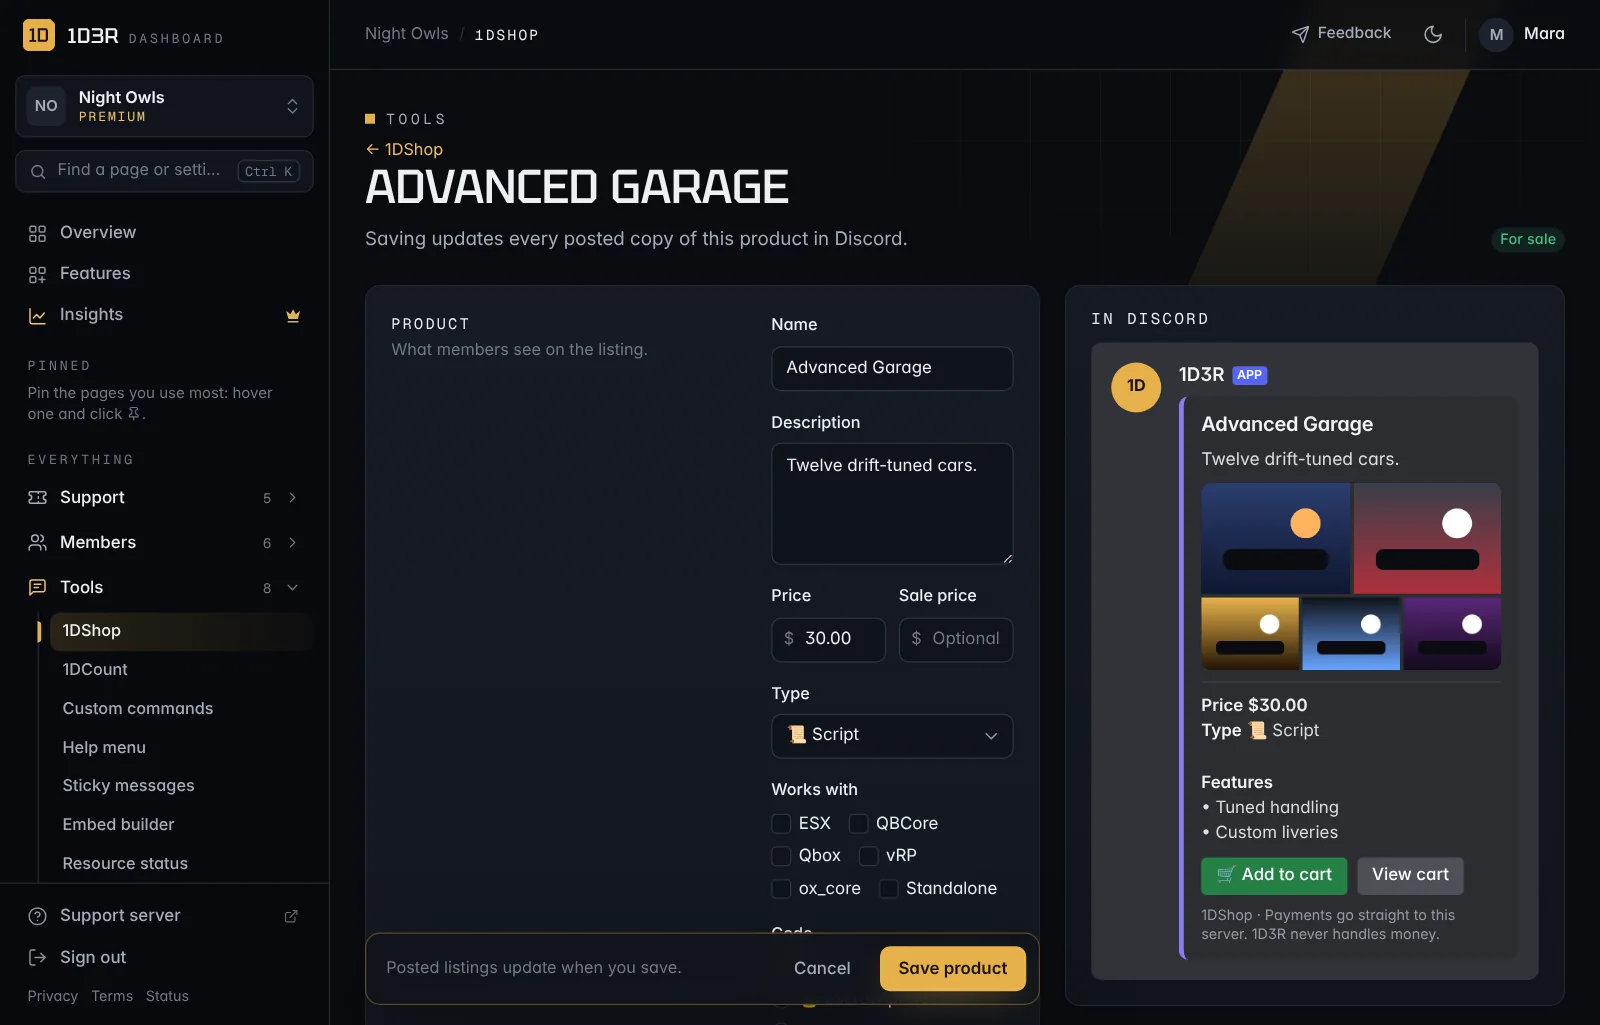
When you change a product, every posted copy of it in Discord updates by itself. Hidden products can't be added to carts, and their listings say they're not for sale.
The free plan has up to 5 products, and Premium up to 200. A shop that had more before this limit keeps them all; it just can't add new ones until it's under 5. With Premium you can also sort products into your own categories (like Police vehicles or Bundles) on the Products page. Only staff see those.
Posting in channels and forums
On a product, Post it asks for a style and a place.
Style:
- Full listing: the photos, details, price and the buttons.
- Buttons only: just 🛒 Add to cart · $price and View cart. Use it in a post you wrote yourself, with your credits, videos and photos. The price on the button follows the product, so a sale shows straight away.
Where:
- A channel like
#shop. - A new post in a forum. Give it a title (the product's name if you leave it empty) and tags. Forums that require a tag on every post need at least one.
- A forum post that's already there: pick it from the list of open posts. For an older post Discord has archived, or any thread, use Or paste a post link: right-click the post in Discord, choose Copy Link and paste it.
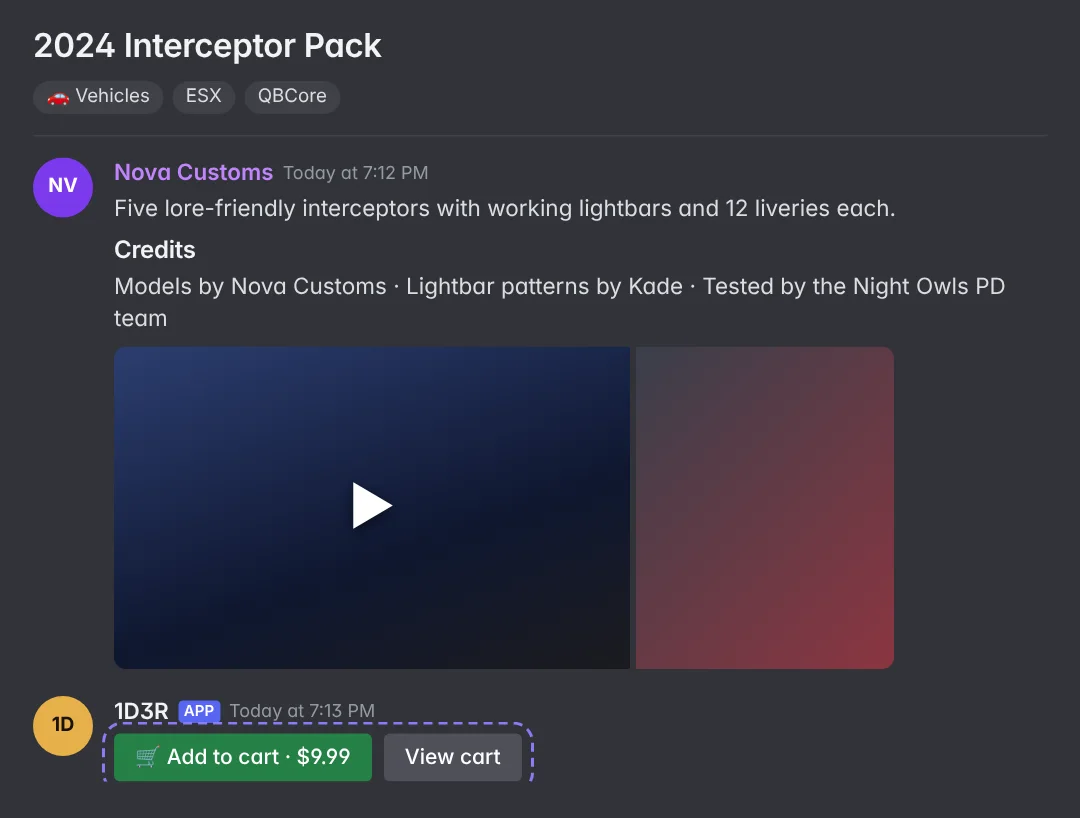
The bot needs Send Messages in Threads (and Create Posts for new forum posts) in that forum. Remove takes a listing back out; for a forum post the bot started, Delete post deletes the whole post.
Shop panels
Post the shop puts every product in one message, and its menus hold up to 100 (four menus of 25). To split a big shop up, make panels: separate shop messages, each with only its own products, like 🚗 Vehicles in #vehicles and 📜 Scripts in #scripts.
- On the Products tab, under Shop panels, press + New panel.
- Give it a title and, if you like, a description (it replaces the "Pick something below…" line). Tick its products under Add products. The filter box helps in a long list. A product can be in more than one panel.
- Arrange them under Order in this panel. That's the order buyers see in the panel's menus and list. Drag a product, or use ↑ and ↓. Sort by name puts FPIU 2 before FPIU 10, and Same order as the shop matches the Products list. Newly ticked products go to the bottom, so when you add FPIU 3 after CVPI 1, move it up next to FPIU 1 and FPIU 2.
- Press Make panel (or Save panel), then post it from Post the shop: under Show, pick Panel: Vehicles and where it goes.
Each panel holds up to 100 products, in up to four menus of 25. A server can have up to 20 panels. Change a panel's products or title and its posted messages update by themselves. Delete panel takes its posted messages down too; the products stay. While Hold posts is on, posting a panel adds it to the launch list like anything else.
/shopadd: type to find a product
Off until you turn it on in Settings → /shopadd. Then members type /shopadd and start typing a product's name. Discord shows the products for sale that match as they type, with their price (and in the cart or already owned where that's true). Picking one adds it to their cart, the same as the shop menu. It finds products by any word in the name, so /shopadd police finds LSPD Police Pack.
Who can use it:
- Members and staff (the default): everyone adds to their own cart. Shop staff can also add
memberto put it in someone else's cart. - Members only: everyone adds to their own cart. Nobody can add to someone else's.
- Staff only: only your shop staff roles and members with Manage Server.
When staff add to someone's cart with member, it works like staff changing an order: if their order is waiting for payment, the order and its total update, and the ticket says staff changed it. It's recorded in the dashboard's audit log. When a shop message has more products than its menus can show, it points members to /shopadd if they're allowed to use it.
Launching a lot of products at once
Adding a big batch to a shop that's already live? Use Launch at the top of the Products tab:
- Press Hold posts for a launch. From now on, Post on a product (or on the whole shop) adds it to the launch list instead of sending it. Your current listings keep working, and buyers see nothing new yet.
- Add and post your products as usual. Edits you make after adding one are included when it posts.
- Press Go live now. The bot posts the whole list one at a time, a little over a second apart, so Discord doesn't block it. 70 listings take about a minute and a half. You can leave the page while it works.
If Discord refuses one (the bot can't see that channel, say), it stays in the list with the reason. Fix it and press Go live again to try just those. When everything is posted, posts go straight to Discord again. If the shop is closed, you can have it open when the launch is done.
How buying works
- A member presses Add to cart on a listing, picks something from the shop menu, or uses
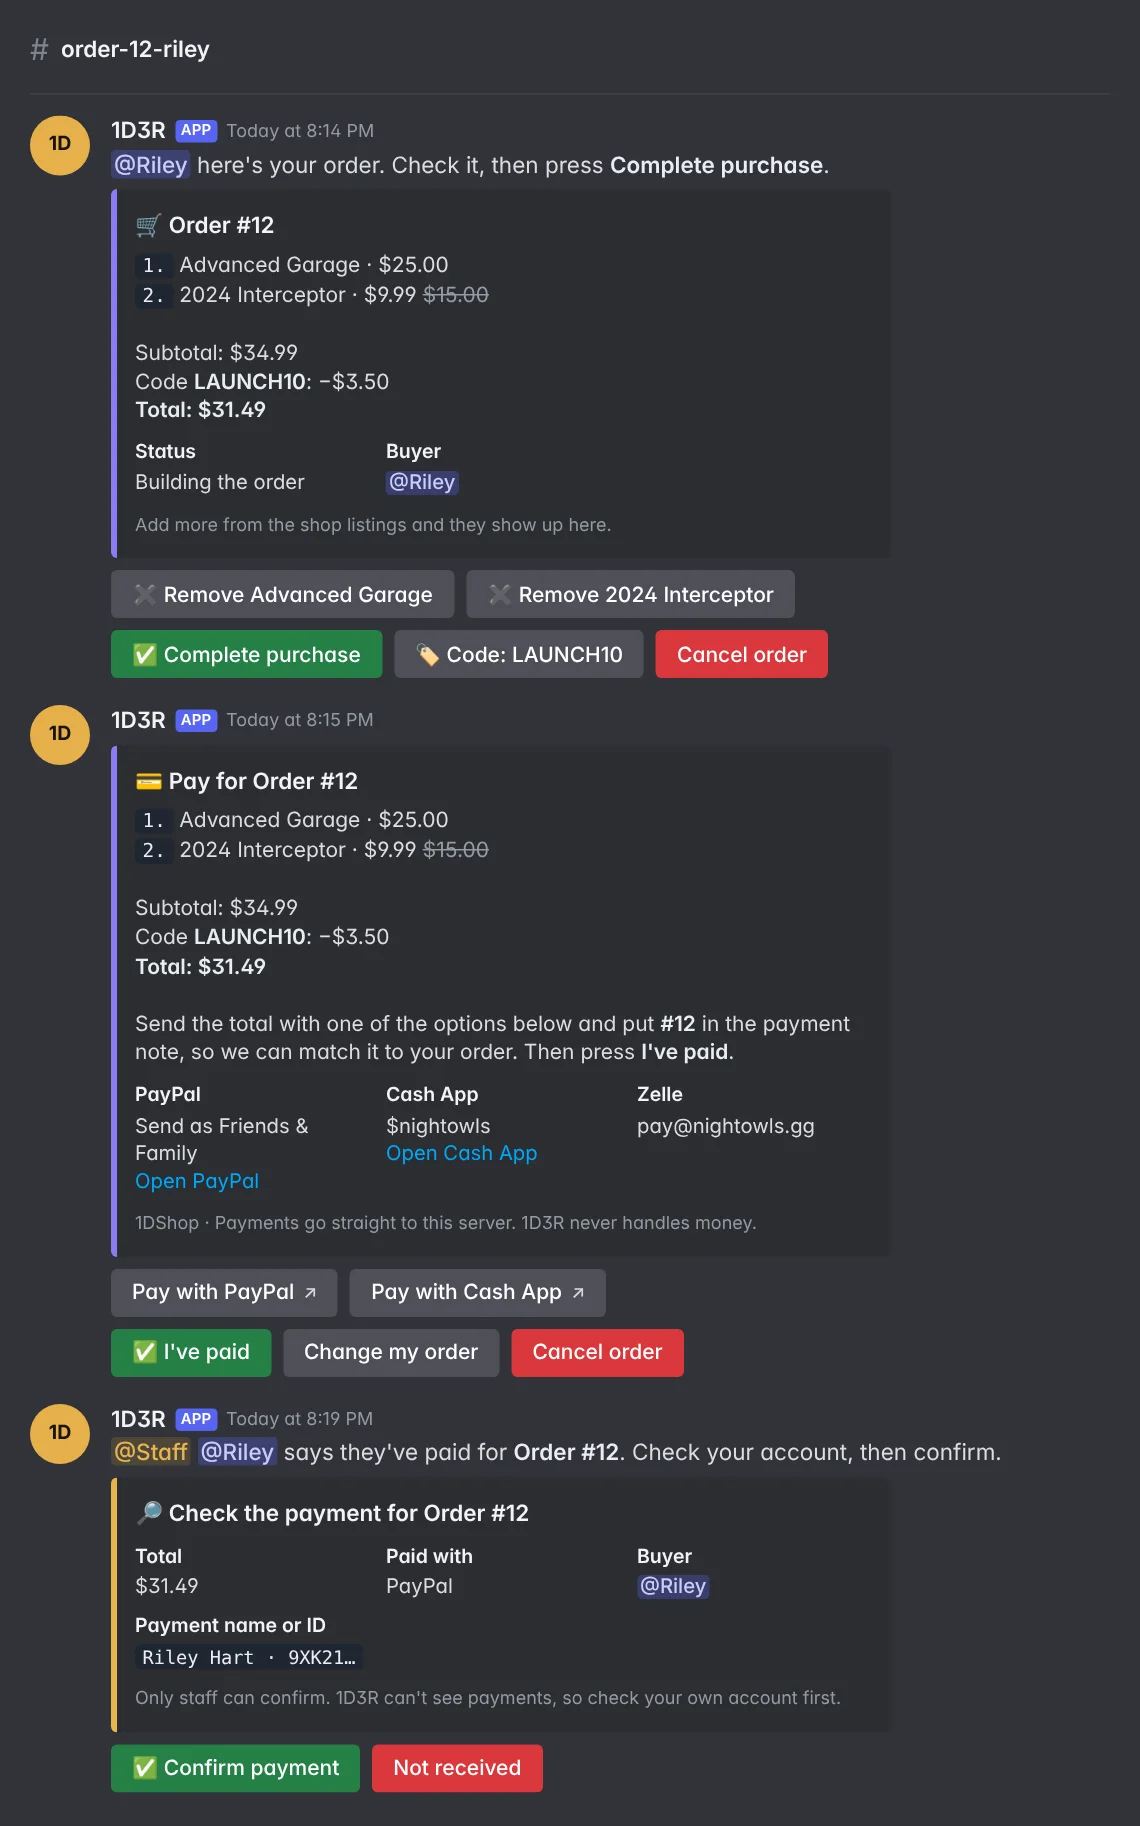
/shop(or/shopadd, if you've turned it on)./cartshows their cart. - They press Check out. The bot asks Ready to check out? first, with what's in the cart and the total, so nobody opens a ticket by accident (you can turn this off in Settings). When they press Yes, open my purchase ticket, a private purchase ticket opens that only they and your staff can see. It lists the cart and the total, with a Remove button for each product. Anything they add to their cart while the ticket is open shows up in it.
- Complete purchase locks the order in. If you've turned on terms of sale, the buyer agrees to them first. Then the bot posts the payment message: every item with its price, any discount, the total, and how to pay. Change my order goes back a step.
- With the payment menu on, the buyer first picks how they'll pay, and gets just that option's instructions and link.
- After paying, they press I've paid. The bot asks which way they paid (unless they picked it from the menu), and for the name or transaction ID on the payment, which is optional but helps you find it.
- With payment photos on, they then upload a screenshot of the payment in the ticket.
- Your staff are pinged with Confirm payment and Not received, in the ticket or in your staff channel.
- Also give these roles: before confirming, staff can pick extra roles for this buyer from the menu above the buttons. They're given together with the product roles.
- Confirm payment: the buyer gets the product roles, the customer role, any extra roles and any spend roles they've earned, plus a receipt by DM (in the ticket if their DMs are closed) with links to the products' download channels. Staff can then close the ticket.
- Not received: staff say what to check. The buyer is told, and can press I've paid again.
Buyers and staff can Cancel order at any time before it's confirmed. Its items go back to the buyer's cart. A member has one open order at a time.
Staff changing an order
On the dashboard, 1DShop → Carts lists everyone with something in their cart, or an order that isn't finished. For each one you can remove a product, add one, change a price (with an optional note the buyer sees), or delete the whole cart, which also cancels their order. If they've checked out, their purchase ticket updates and says what staff changed. Changed prices show the old price crossed out and (adjusted by staff), and stay through checkout. Discount codes and role discounts still apply to them.
In Discord, staff can use /cart and pick a member to see that member's cart or order, only to themselves. Use Take something out and Put something in to change it. If the member has already checked out, the order in their ticket and the payment message update with the new items and total, and the ticket says that staff changed it. An order needs at least one product, and once the buyer says they've paid it can't be changed (press Not received first).
Buying again while a ticket is still open
Tickets often stay open after an order is confirmed, for questions. In Settings → Purchase tickets, pick what happens when that buyer checks out again:
- Open a new ticket every time (the default): no limit, each order gets its own ticket.
- Let the buyer choose: they get Use my current ticket or Open a new ticket.
- Always use their open ticket: the new order goes into it. The ticket is renamed with every order in it, like
order-1-2-mara(it follows your channel name, with the numbers joined). Discord only lets a channel be renamed twice in 10 minutes, so the new name can take a few minutes to show. - Close it and open a new one: the open ticket closes, with its transcript saved, and a new one opens.
While an order is still waiting for payment, checking out again always goes back to that order. In a ticket with more than one order, cancelling the newer order keeps the ticket open for the older one, and Close ticket only works once every order in it is confirmed or cancelled. A checkout from a cart reminder DM opens a new ticket when buyers would otherwise be asked.
Settings
- Currency: USD, EUR, GBP, CAD, AUD and more.
- Messages: what the bot says with the payment links, and in the receipt.
{order}fills in the order number and{total}the total. Asking buyers to put the order number in their payment note makes payments easy to match. - Purchase tickets: which category they open in (your ticket category if you don't choose one), the channel name (
{number}and{user}fill in), and when unpaid orders close by themselves (2 days by default). The buyer gets a DM when that happens. - Give every buyer: a role for anyone with a confirmed order, like Customer.
- Staff check payments in: where Confirm payment is posted when a buyer says they've paid. Leave it empty to post it in the purchase ticket. With a separate channel, the buyer is told in their ticket that staff have been told, and the staff message links back to the ticket.
- Receipts and transcripts: a channel that gets a copy of every receipt, and a link to the purchase ticket's transcript when it closes. Transcripts need Premium. Each copy shows the buyer, who confirmed it, and every role given with the reason, for example bought Advanced Garage, every buyer gets it, spent $127.00 here, over $100.00 or added by @Rev. A role that couldn't be given says why. The orders log shows the same list.
- Logo on receipts and Logo on the shop listing (Premium): the 1DShop logo, your server's icon, or your own uploaded logo. The receipt one is on the receipt buyers get by DM and the copy in your receipts channel; the shop listing one is in the top corner of the shop message and
/shop. - Ping when someone pays: the roles pinged when a buyer says they've paid, if you want fewer than every staff role. For example ping only Owner, while Staff, Developer and Owner can all confirm.
- Ping when a purchase ticket opens: roles pinged in the ticket as soon as a buyer checks out, so someone can help them before they pay. Off (nobody) unless you pick roles.
- Ask “Ready to check out?”: on by default. Before a purchase ticket opens, buyers see their cart and total and confirm they're ready to buy. It cuts down on tickets opened by accident and cancelled straight away. Untick it to open the ticket as soon as they press Check out.
- Buyers can close their own ticket: on by default. Untick it if only staff should close purchase tickets, for example so you can follow up after a sale. Buyers can still cancel an order they haven't paid for.
- Orders log: a channel where paid, confirmed and cancelled orders are posted.
Roles with staff permissions (like Administrator or Manage Server) can't be given by the shop.
Shop hours and delay notices
Free. Both tell buyers who have just paid that confirming may take a little longer than usual, so nobody thinks they've been ignored. Nothing shows before they pay (not at checkout or when the purchase ticket opens), so it never puts anyone off buying.
Shop hours. In Settings, turn on Use shop hours and set, for each day, the time your staff are usually around. Untick a day to mark it away all day. An end earlier than the start runs past midnight (8:00 PM to 2:00 AM), and the same start and end means all day. Times are in the shop's time zone (top of Settings).
When a buyer presses I've paid outside those hours, their purchase ticket gets a note under the staff message. It says checking their payment may take a little longer, and that their order is saved and there's nothing else to do. It also shows when staff are usually back, in the buyer's own time, and your hours for the week. You can write your own message instead of the default one.
Delay notice. Away for a while? Staff use /shopdelay:
duration: how long, like30m,2h,1dor1d 12h(up to 30 days). Typeoffto end it early.message(optional): what buyers see, like Out until 6 PM, orders get confirmed after that.tell_waiting_buyers(optional, yes if empty): also post it once in the tickets of buyers who've already paid and are waiting for a check. Buyers still shopping aren't told.
While it's on, every buyer who presses I've paid sees it, with when you're expected back. It wins over shop hours and ends by itself. Staff can end it early with End it now, /shopdelay off, or from the Delay notice box in Settings, where you can also turn one on. /shopdelay works for your shop staff roles and anyone with Manage Server. It's recorded in the dashboard's audit log.
Terms of sale
Optional, and free. Turn on Ask buyers to agree to my terms in Payments & settings, then write your terms (up to 3,000 characters) or add a link to them, or both.
When a buyer presses Complete purchase, they see your terms (only they can see them) and, if you added a link, Read the full terms. The payment details are posted only after they agree. They agree once for every order, and the payment message and the staff message both show when they did.
How they agree:
- Press I agree: one button.
- Type "I agree": Agree to the terms opens a box and they have to type the words (capitals and a full stop don't matter). Anything else is refused. Staff see that the buyer typed it.
Lock the order once they agree: after agreeing, the buyer can't change the order themselves (there's no Change my order). If something needs to change, staff can do it with /cart (see staff changing an order).
Transaction fees
Each payment option can charge the buyer a little extra, like $2.00 for PayPal or 3.5% for a card. It's off for every option until you turn it on.
- In Settings > How buyers pay you, set Transaction fee to Add a fee on that option.
- Enter a flat amount, a percent, or both (for example 3.5% + $0.30). A percent can be up to 30%.
Buyers always see the fee before they pay:
- Every option shown at once: an option with a fee shows its own total, for example "$27.00 with PayPal (includes a $2.00 fee)". The fee is added once they say they paid with it.
- Payment menu: the menu shows "+$2.00 fee" next to that option. After they pick it, their total includes the fee.
- Only one option: the total includes the fee from the start.
{total} in an option's details or instructions is that option's total, with its fee. The staff message, receipt and ledger include the fee. Product prices, discounts, sales stats and spend roles don't.
The payment menu
Free. Turn on Let buyers pick one option from a menu under How buyers pay you. Instead of every payment option at once, the buyer gets a menu:
- They pick an option, like Cash App.
- The bot posts a message just for that option: its own instructions, its details, and a Pay with… button with the link.
- Change payment method removes that message and brings the menu back, so they can pick another.
Each payment option has its own instructions box for this, for example Send as Friends & Family with #{order} in the note. {order} and {total} fill in. An option without instructions uses your main message. The menu needs at least two options.
Payment photos
Free. Turn on Ask for a photo of the payment. After the buyer presses I've paid, the bot asks them to upload a screenshot or photo of the payment in their ticket. As soon as they post a picture, it's put in the message to staff, and staff are pinged.
The bot doesn't read the picture or check it, so always look at your own account too. Only pictures from the buyer count. While the bot waits, the buyer can still cancel, and staff can press Skip the photo (staff) if the buyer can't upload one. A photo too big to re-upload is sent to staff as a link instead.
Orders
1DShop → Orders lists every order with its items, total and status: open, waiting for payment, waiting for staff to check, confirmed or cancelled. Open ticket jumps to its purchase ticket in Discord. Delete removes an order completely (for test orders): from orders, sales, the ledger, its review and the buyer's purchases. Roles already given stay, so take those back by hand if needed. Product names in carts, purchase tickets, payment messages and receipts link to the product's listing, so buyers and staff can open it again. With web transcripts (Premium), each purchase ticket is saved as a transcript when it closes.
Store-wide sale (Premium)
Put everything in your shop on sale at once in 1DShop → Discounts → Store-wide sale:
- Amount off: 1% to 90%.
- Time zone for the dates: your shop's time zone unless you pick another one. The start and end times you pick are in this time zone. In Discord, everyone sees the end time in their own time zone.
- Starts: now, or at a date and time you pick with the date and time picker. The quick buttons fill in tomorrow at 9 AM, Friday at 6 PM or the 1st of next month.
- Ends: when you turn it off, at a date and time you pick, or after a set time, like
3dfor a weekend or1wfor a week. The quick buttons add a day, 3 days or a week to the start, or pick Sunday at 11:59 PM. Prices go back to normal by themselves when it ends. - Under the dates, a line shows when the sale starts and ends and how long it runs, and warns you if the end is before the start or already passed.
- Leave these products out: products that keep their normal price. Free products are never changed.
- Line on the shop message: shown at the top of your shop message and
/shopwhile the sale runs. If you leave it empty, it says something like "20% off everything until Sunday 6:00 PM".
Every posted listing, cart and purchase ticket shows the sale price with the normal price crossed out, and updates when the sale starts and ends. If a product has its own sale price that's lower, that one is used.
Other discounts during the sale. Two boxes decide whether discount codes and role discounts still work:
- Ticked (the default): they stack with the sale, following your With a discount code too setting.
- Unticked: they don't combine with the sale. They only count products that were left out of it, and the buyer's order says why. A code that isn't used doesn't count as a use, so the buyer can use it another time.
When they stack with the sale, you choose how they add up:
- Add them together (the default): everything comes off the original price. A 30% sale and a 10% role discount make 40% off.
- One after the other: the sale comes off first, then the other discounts come off the sale price. A 30% sale and a 10% role discount make 37% off.
Discounts never take an order below free.
Once a buyer presses Complete purchase, their price is locked in, even if the sale ends before they pay.
Store credit and gift cards (Premium)
1DShop → Store credit lets you give members money to spend in your shop, for example as a refund, a thank-you or an event prize.
- Give store credit: enter the member's Discord user ID (right-click them in Discord and choose Copy User ID), the amount and an optional note. Leave DM them ticked and the bot tells them. Take away removes credit, for example after a refund.
- At checkout, store credit comes off what's left after discounts. It shows in their cart, on the order in the purchase ticket, on the payment message, on the staff message and on the receipt as Store credit: −$15.00, with the Total to pay. Buyers can press Don't use my store credit to save it for later.
- If credit covers the whole order, there's nothing to pay: the buyer gets Send to staff instead of payment links, and staff confirm it as usual.
- If the order is changed, cancelled (by the buyer, staff or automatically) or deleted, the credit goes back to the buyer.
- Who has store credit lists every balance, and Recent changes shows every time credit was given, used, returned or taken away, and by whom.
Gift cards are codes for a set amount, like GIFT-7KQ2-M9XD-4HPW.
- Make gift cards: an amount and how many (up to 50 at once). You can choose the code for a single card, set the last day it works, and add a note.
- Send it to someone: enter their user ID and the bot DMs them the code.
- Redeeming: members press Redeem a gift card in their cart, or type the code in a purchase ticket. The amount becomes store credit. Each code works once.
- All gift cards shows which are active, redeemed (and by whom), expired or turned off. You can turn a card off, delete one that hasn't been redeemed, or download them all as a CSV.
- Codes are hard to guess, and after six wrong codes a member has to wait a few minutes before trying again.
Credit only counts as money in your Sales and Ledger when it was actually paid, so an order paid with store credit adds what was left to pay. If Premium ends, members keep their credit and can still use it and redeem gift cards; you just can't give new credit or make new cards.
Role discounts (Premium)
On Discounts, give members with a role a percent off automatically, for example Server Booster 10% off or VIP 25% off. You can add up to 10 roles, including the Server Booster role. A member with more than one gets the biggest.
The discount is worked out from the roles the buyer has when they press Complete purchase, and shows in their cart, the purchase ticket, the payment message, the staff message and the receipt. If they lose the role after that, the price they were given stays.
With a discount code too, you choose what happens:
- The bigger discount wins (the default): only one applies. If the role discount saves more, the code isn't used and doesn't count as a use.
- Add them together: both come off the full price. A 30% role and a 20% code make 50% off, so a $100 order costs $50. The total never goes below free.
- One after the other: the role discount comes off first, then the code comes off the new price. With a 30% role and a 20% code, a $100 order becomes $70, then $56.
Whichever you pick, the buyer sees each discount on its own line in their order, the payment message and the receipt. A fixed-amount code (like $5 off) works with all three.
Spend roles
Free. Give a role to members once they've spent a certain amount in your shop, like Senior Customer at $100 and VIP at $500. Add up to 5 under Payments & settings → Spend roles.
What counts, over every confirmed order:
- Product prices: the prices of everything they've bought, before discounts. A $100 product bought with 20% off counts as $100.
- What they paid: totals after discounts. The same product counts as $80.
The role is given when staff confirm the order that gets them there, together with the product roles.
Reviews
Free. Turn on Ask buyers for a review and choose how many days after the order is confirmed (3 by default). The buyer gets one DM with 1 to 5 stars. After picking, they can add a comment.
- Every review is on 1DShop → Reviews, with your average rating and how many of each star. You can delete a review there.
- Post reviews in: pick a channel and each review is posted there too, with the stars, the comment and what they bought.
- Only orders confirmed after you turn reviews on are asked, so turning it on doesn't message everyone who bought before.
Reviews for commissions
For things you sell outside the shop, like a commission or a custom order, staff can ask for a review with /shopreview:
- Type
/shopreviewand pick the member. Optionally add the item (they can change it), and choose whether to send it to their DMs (the default) or this channel. - They pick a star rating, then say what they bought and how it was.
- The review is posted in your reviews channel (if you set one), and shows under 1DShop → Reviews with your other reviews and in your average.
If their DMs are closed, the request is posted in the channel you used, mentioning them. A request is open for 30 days, and only that member can answer it.
Cart reminders
Free. Turn on Remind members about their cart and choose how long a cart sits before the reminder (2 days by default). Members who left things in their cart, with no order open, get one DM with what's in it and two buttons:
- Open my order: opens their purchase ticket in your server, as if they'd pressed Check out.
- Clear my cart: empties it.
Give them a code for: pick a percent (like 15% off) and each reminder comes with a code made just for that member. It works once, only for them, for the number of days you choose, and it's added to their order when they press Open my order. These codes work on every plan.
Each cart is reminded about once. If they change their cart, it counts as a new one. Only carts from after you turn reminders on are included.
Discount codes (Premium)
On Discounts, make a code for a percent or an amount off. You can limit how many times it's used and how many days it lasts. Buyers add a code in their purchase ticket. An order waiting for payment holds one of the code's uses, so a code limited to 10 uses can't end up on 11 orders. The use is counted for good when staff confirm the order, and given back if the order is changed or cancelled.
Sales (Premium)
Sales shows revenue, orders, the average order and how many members bought something, for the last 7, 30 or 90 days, compared with the period before. It also shows revenue per day, your best sellers, and how many purchase tickets ended up confirmed or cancelled.
Ledger (Premium)
Ledger keeps a record of every payment, for your own bookkeeping. Each confirmed order is added by itself, with the payment method and the payment name or ID the buyer gave. You can fill in the transaction ID, the fee your payment app took, refunds (full or partial) and chargebacks: when one was opened, its case ID and reason, and whether you won or lost it. You can also add a payment by hand for a sale outside the shop.
It shows each month's money received, fees, refunds, chargebacks lost and net, and any open chargebacks, with a table for the last 12 months and a CSV download for a spreadsheet or your accountant. Net is the amount less the fee, refunds and lost chargebacks. Days and months follow the shop's Time zone (Payments & settings), which starts as your server's time zone; Sales uses it too. 1D3R can't see your payment accounts, so the ledger has what you enter.
Good to know
- 1DShop doesn't check payments. Always look at your own PayPal, Cash App or bank account before pressing Confirm payment.
- Only sell things you have the right to sell. Payment services can close accounts that sell ripped or unlicensed content.
- Deleting a purchase ticket channel by hand cancels its order.